Queen Bee

Queen Bee

Friday, October 22, 2010

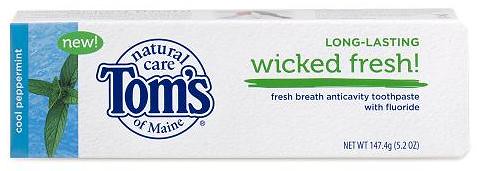
NEW CAMPAIGN: Fight Bad Breath With WICKED FRESH!


I have a new campaign coming!  This time I get to fight bad breath with Tom's of Main Wicket Fresh! toothpaste.  I've been using another toothpaste from a company called Melaleuca for so long that I don't know if I will be able to switch for the duration of this campaign...but of course I'll try!  Here's the information I received to tell me about the product that should take a few weeks to arrive: 

Proven to help banish bad breath, Tom’s of Maine Wicked Fresh! toothpaste combines a patent-pending boost of botanical extracts and great-tasting natural mint oils to fight bad breath germs for hours. The result? Long-lasting fresh breath — naturally!
Monday, October 18, 2010

This Weeks Craft!! Adorable Magnetic Recipe Box!

I love this campaign!  Elmer's has so many neat projects for you to tackle either alone or with your kids.  If you're a teacher...get your students to make this for their mom's this Mother's Day!

Magnetic Recipe Box

A special look to bring back memories of the past.

Skill Level: Moderate
Time Needed: 4 to 6 hours
Appropriate For: Mother's Day, Birthday, Bridal Shower


Supplies Needed:
  • Elmer's® Products, Inc.:
  • Craft Bond™ Extra Strength Glue Stick
  • Craft Bond™ Fabric & Paper Glue
  • X-ACTO® Gripster® Knife
  • X-ACTO® Self-Healing Cutting Mat
  • X-ACTO® Rotary Paper Trimmer
  • White tin lunch box, 5" x 7" x 4 1/2" tall
  • Magnetic sheeting 5" x 8"
  • Six 1/2" button magnets
  • Scrapbook paper, 12" x 12": light blue dot; red gingham
  • Cardstock, 12" x 12", white
  • Melissa Frances™ Heart & Home Collectibles, Inc. Vintage Labels, Kitchen Gadgets Collection: Crafty Cutters Ad, 2 1/2" square; Rose's Cake Tins Ad, 1 1/2" x 2 1/2"
  • Monogram transfer letters, black, 3/4"
  • Crafty Cutters Cookie Cutters, Star & Heart, 1 1/4"
  • 24" length of 3/8" wide striped ribbon to coordinate
  • 18"length of 1/4" wide red gingham ribbon
  • 1 3/4 yd. length of 3/8" wide red grosgrain ribbon
  • Misc.:
  • scissors

Instructions

  1. Cut two 4" x 12" red gingham strips to wrap around lunch box. Use Craft Bond™ Extra Strength Glue Stick to attach paper to box matching seams at sides.
  2. Measure and cut needed length of red grosgrain ribbon to use as top and bottom border of paper on box. Use Glue Stick to attach.
  3. Choose transfer letters to spell desired word. Rub the first transfer letter onto blue dot paper. Cut the letter into a 1" square. Repeat with other letters. To mount, attach magnetic sheeting to red gingham paper, working with an approximately 2" x 12" piece. Use X-ACTO® Gripster® Knife to trim into enough 1 1/2" squares for each of the letters. Use Glue Stick to glue blue square letters onto red gingham with magnetic back. Set aside.
  4. Use Glue Stick to attach labels to white cardstock for added stability. Cut out label. Glue button magnets on back of labels for added dimension as well as to connect to recipe box. Set aside.
  5. Use Craft Bond™ Fabric and Paper Glue to attach button magnets to cookie cutters. Let dry.
  6. Accent recipe box by cutting various lengths of remaining ribbon and tie to either side of handle, cookie cutters and label. Place letters, cookie cutters and labels onto box to decorate. Rearrange and redesign as you wish since magnets can be moved!
#imabzzagent

Tuesday, October 5, 2010

This Week's Project: CLEVER CLIPBOARD

This week's featured BzzAgent project

Start your scissors and get your tape runners revving with this featured crafting project from Elmer's® Craftbond™ and X-ACTO® Designer Series products:

Week Two

"CLEVER CLIPBOARD"

DESIGNED BY: Craft Marketing Connections, Inc.
SKILL LEVEL: Intermediate
TIME TO COMPLETE: 1-3 hours
APPROPRIATE FOR: Office, Kitchen, Memo Organizer
PROJECT TYPE: Paper Crafting

SUPPLIES NEEDED:

  • Elmer's® Products, Inc.:
    • CraftBond™ Extra Strength Glue Stick
    • CraftBond™ Glue Tape Runner, Permanent
    • CraftBond™ Foam Mounting Tape
    • X-ACTO® Designer Series Retractable #1 Knife
    • X-ACTO® Designer Series 12" x 12" Self-Healing Cutting Mat
    • X-ACTO® Designer Series 12" Metal Ruler
    • X-ACTO® Designer Series 8" Scissors
    • X-ACTO® Designer Series 12" Rotary Paper Trimmer
    • X-ACTO® Designer Series Scallop 4 Pack Decorative Edge Scissors
  • 9" x 12 1/2" clipboard
  • One each 12" x 12" scrapbook paper: green leaf print, green plaid, brown leaf print
  • 3/16" x 5 1/2" x 8" cork sheet
  • 42" length of 3/8" wide brown gros-grain ribbon
  • 8" length of 3/8" wide brown sheer ribbon
  • Two 3/4" green stripe decorative paper clips
  • Four 1/2" green stripe decorative push pins
  • 1" brown chipboard letters to spell "STUFF"
  • Approx. 5" x 7" envelope (to use as pattern)
  • Hand drill
  • Pencil

PROJECT DIRECTIONS:

  1. Use X-ACTO® Designer Series 12" Rotary Paper Trimmer to cut papers: 8 1/2" x 10" and 2 3/4" x 4 3/4" green leaf print; 4 1/2" x 10" and 1 3/4" x 3 3/4" green plaid. Use X-ACTO® Designer Series Metal Ruler and pencil to measure and draw 5 1/2" x 8" on cork. Use X-ACTO® Designer Series Retractable #1 Knife and 12" x 12" Self Healing Cutting Mat to cut cork. Set aside. Retract knife when not in use.
  2. Use CraftBond™ Extra Strength Glue Stick to attach larger green leaf paper to top part of clipboard. Use Retractable Knife to cut around metal clip at top of clipboard. Similarly, use Glue Stick to attach larger green plaid paper at bottom of clipboard. Turn over clipboard onto Cutting Mat and use Retractable Knife to trim paper from curved corners.
  3. Use X-ACTO® Designer Series 8" Scissors to cut brown ribbon into two 4", one 9" and one 25" lengths. Similarly, use Scissors to cut brown sheer ribbon into two 4" lengths. Use CraftBond™ Permanent Glue Tape Runner to attach 9" ribbon where green leaf and green plaid papers meet. Set other ribbon aside.
  4. To make pattern from envelope, carefully pull apart envelope to open and flatten. Use pencil to trace around envelope onto brown leaf print paper. Use X-ACTO® Designer Series 8" Scissors to cut out. Fold brown paper into envelope and use Glue Stick to secure contact areas. Set aside.
  5. Use Glue Stick to attach cork to green leaf paper on clipboard. Use CraftBond™ Foam Mounting Tape to attach envelope onto board under cork.
  6. Use X-ACTO® Designer Series Scallop Pack Decorative Edge Scissors (Scallop) to trim around green leaf rectangle. Use Glue Stick to attach green plaid rectangle to green leaf rectangle. Similarly, use Glue Stick to attach word "STUFF" to green plaid rectangle. Use Foam Mounting Tape to attach rectangle to lower right corner on front of brown envelope.
  7. For clipboard hanger, use hand drill to drill holes 1" in from sides at top of clipboard. Thread 25" ribbon through holes on clipboard, tie and knot. Also tie and knot 4" lengths of brown sheer and gros-grain ribbons, to each side of clip at top of clipboard. Place push pins into cork and slide paper clips onto either side of envelope. Hang clipboard to use.
#imabzzagent

Friday, October 1, 2010

NEW CAMPAIGN!! Glade® Winter Collection


Glade® Winter Collection Is Here!!
 
In a few weeks I'll have the Glade Winter Collection to help make my house smell like Christmas!! With SEVEN scents  to choose from, you could literally have a new wintery smell in your house each day of the week!  I've used these candles before and surprisingly they are just as good as the expensive scented candles you get from the mall or catalogs.  Here's their collection:

  • Apple Cinnamon
  • Bayberry Spice and Everything Nice™
  • French Vanilla
  • Sugarplum Fantasies™
  • Chocolate Cherry Sparkle™
  • Baked Magic™
  • Peppermint Crush™


I really do love all the winter scents but I am keeping my fingers and toes crossed for Peppermint Crush and Sugarplum Fantasies scents to arrive in my bzzagent kit!! 

 
 Baked Magic wouldn't be so bad either!
(**hint hint bzzagent box filler!!**)